Building Java Native Interface (JNI) Projects
The Nokee plugins use a convention-over-configuration approach to building JNI projects. If you are familiar with the other Gradle plugins, you should feel right at home. If you are coming from another native build system, these concepts may be unfamiliar at first. Still, they serve a purpose to simplify build script authoring.
In this chapter, we will look at JNI projects in detail. The chapter covers the core concept behind the configuration of JNI projects. If you are only looking for a solution to a particular use case, have a look at the samples. If you are simply looking for a quick reference for a particular plugin, have a look at the plugin reference chapters.
What’s a Java Native Interface (JNI) project?
A JNI project stands for a JVM-based project (typically written in Java) calling foreign methods (typically written in C or C++) over the Java Native Interface (a programming interface). The foreign methods written in native language are linked into a shared library specific to the target machine and loaded at runtime inside the JVM. As shown in the following diagram, the build process is much more complicated than a normal JVM project.
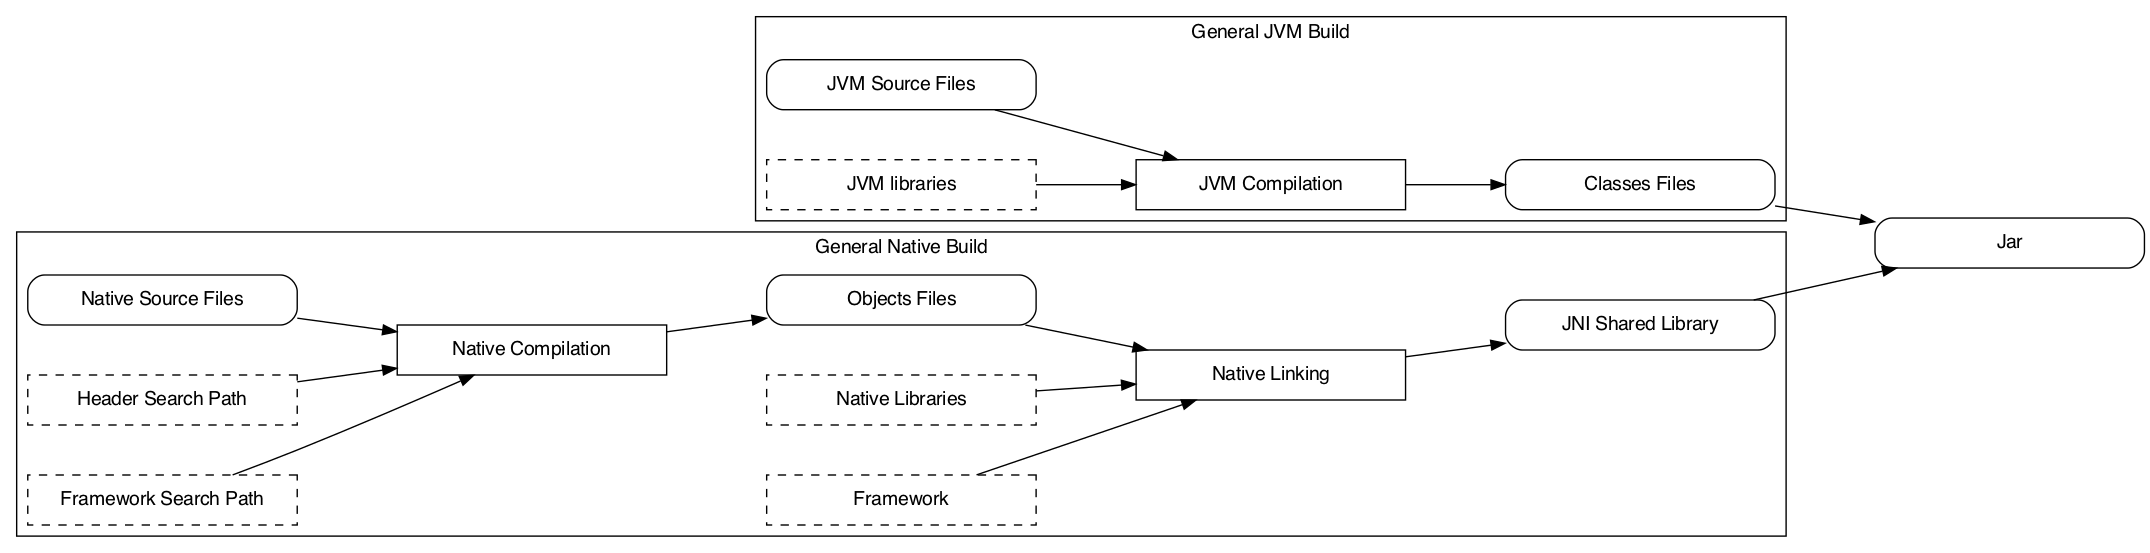
The complexity lies in the multiple build variant such projects need to handle gracefully. Despite being more complicated, the basic building blocks are simple to understand. This chapter is about explaining each of the model elements and their effect on the project’s configuration.
Choosing the right plugins
| All Nokee plugins follows the plugin identification triplet convention. Read the Anatomy of a Nokee Plugin chapter to learn more. |
The JNI Library Plugin is the only plugin available for targeting the JNI runtime. First, let’s understand the plugin identification:
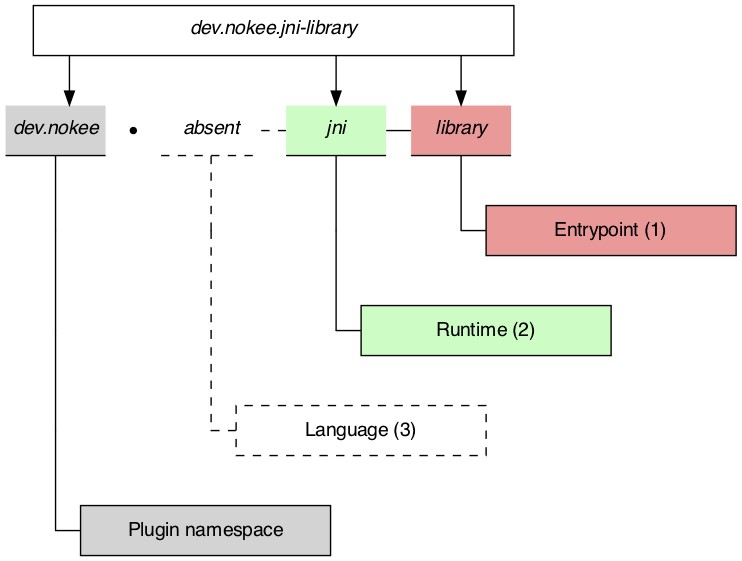
As shown, the plugin only provide the library entry point and JNI runtime capability to the project. It has no opinion on the implementation language of the project’s component. The implementation language refers to what language will be complied to form our project’s artifacts. We will need to choose the corresponding language plugins to apply as well.
| Applying language plugins is not required when composing a JNI library from various sources. The JNI components could be coming from different build systems that are orchestrated by Gradle. Please suggest and vote for the external build system wrapper that would be the most beneficial for you. |
Here is a list of all the language plugins available:
dev.nokee.c-language-
Provides support for compiling C language.
dev.nokee.cpp-language-
Provides support for compiling C++ language.
dev.nokee.objective-c-language-
Provides support for compiling Objective-C language.
dev.nokee.objective-cpp-language-
Provides support for compiling Objective-C++ language.
java(maintained by Gradle)-
Provides support for compiling Java language. Gradle distributes the plugin inside the Gradle distribution.
groovy(maintained by Gradle)-
Provides support for compiling Groovy language. Gradle distributes the plugin inside the Gradle distribution.
org.jetbrains.kotlin.jvm(maintained by Jetbrains)-
Provides support for compiling Kotlin language. Jetbrains distributes the plugin on the plugins portal.
If we would like to build a JNI library implemented in Java and C++, we would apply the dev.nokee.jni-library, dev.nokee.cpp-language and java plugins as shown below:
plugins {
    id 'dev.nokee.jni-library'
    id 'dev.nokee.cpp-language'
    id 'java'
}plugins {
id("dev.nokee.jni-library")
id("dev.nokee.cpp-language")
id("java")
}Model overview
Now that we choose the right plugins to apply to our project, let’s look at an overview of the model.
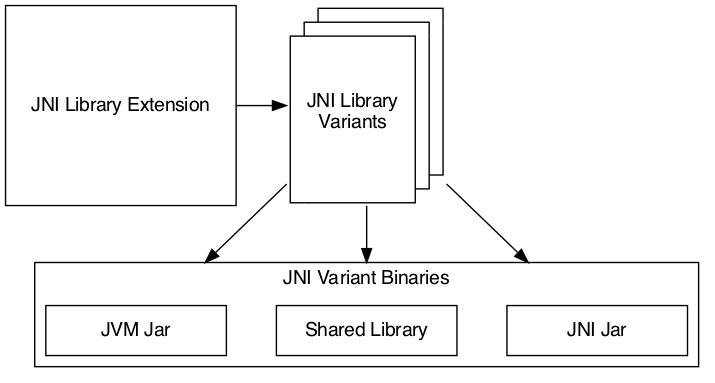
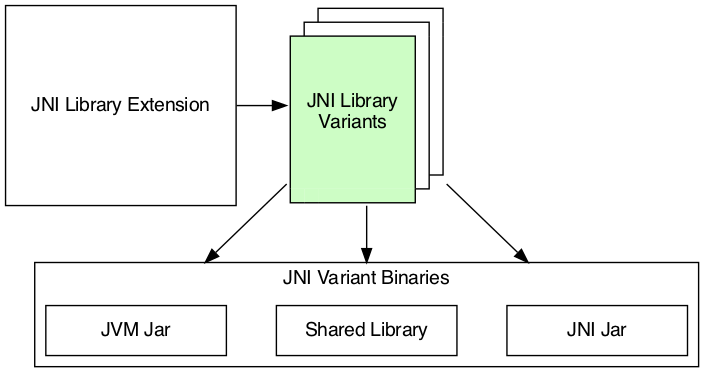
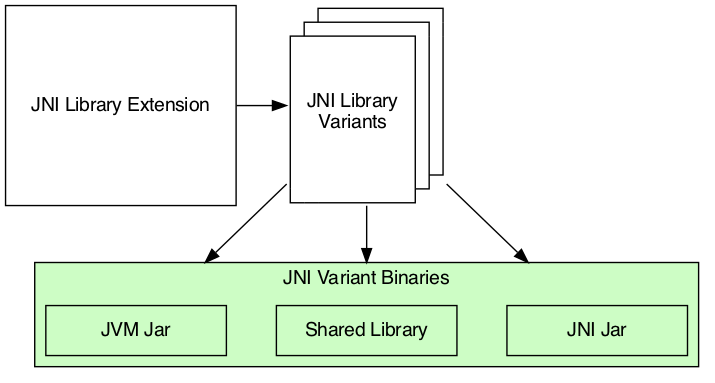
We divide the model into three main elements:
-
JNI Library Extension: The extension is our configuration entry point. From there, we can configure every detail as well as access to the other model elements.
-
JNI Library Variants: The variants are each instance of the JNI library that we can build. For example, each target operating system family will result in a separate variant.
-
JNI Library Binaries: The binaries are the artifacts built for each variant. We will find the JAR(s) and shared library built for a particular variant.
We will detail each part of the model over the next few sections.
JNI library extension
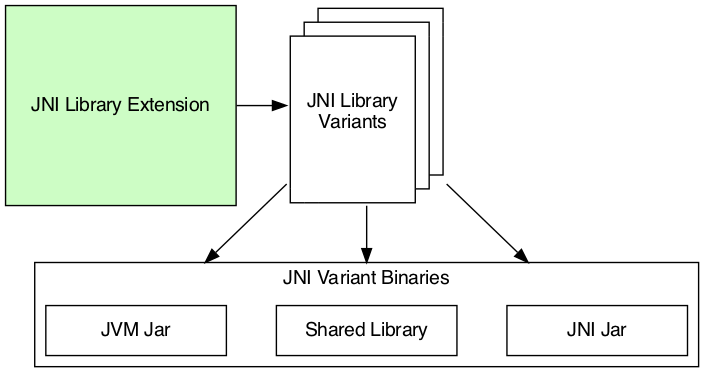
We use the extension for configuring the dimension values participating in the variant creation. We also use the extension to query the created variants and binaries through the views provided. The extension is our first stop for configuring everything from target machines to dependencies on each variant and binaries.
Source set
Source sets are not configurable at the moment. The plugin will use the default source layout for each language. It will become configurable in future releases. Here is the default source layout for each language relative to the project directory:
- C language
-
src/main/c - C++ language
-
src/main/cpp - Objective-C language
-
src/main/objc - Objective-C++ language
-
src/main/objcpp - C headers
-
src/main/headers
Target machines
The target machines represent machines the JNI shared library should build. There are two important aspects:
-
The target machine, which combine the operating system family and machine architecture; and
-
The target machine factory provides a fluent API for building target machines.
The factory is accessible as an extension of the library component named machines to allow easy configuration:
library {
    targetMachines = [machines.windows.x86, machines.macOS, machines.linux.x86_64]
}library {
targetMachines.set(listOf(machines.windows.x86, machines.macOS, machines.linux.x86_64))
}Dependencies
The extension provides a configuration block named dependencies to configure dependencies for all variants.
There are three buckets of dependencies to choose from:
library {
    dependencies {
        api project(':jni-bindings')                            (1)
        jvmImplementation project(':native-loader')             (2)
        nativeImplementation project(':native-greeter')         (3)
        nativeImplementation 'dev.nokee.framework:JavaVM:10.15' (4)
    }
}library {
dependencies {
api(project(":jni-bindings")) (1)
jvmImplementation(project(":native-loader")) (2)
nativeImplementation(project(":native-greeter")) (3)
nativeImplementation("dev.nokee.framework:JavaVM:10.15") (4)
}
}| 1 | API dependencies, transitively exposed to consumers of the library. |
| 2 | JVM implementation dependencies, compile dependencies for the JVM component of the library and runtime dependencies for the consumer of the library. |
| 3 | Native implementation dependencies, compile and link dependencies of the native component of the library. |
| 4 | Dependencies on macOS system framework uses external dependency notation with the dev.nokee.framework special group. |
The JNI library assumes the native component to be an implementation detail of a JVM library. For this reason, there aren’t any native dependencies transitively exposed to the consumers of the library. The plugin package all executable native artifacts from the dependencies inside a JAR file. It exposes the resulting JAR file to the consumers as runtime dependencies.
The JVM compileOnly and runtimeOnly dependency buckets are available via jvmCompileOnly and jvmRuntimeOnly respectively.
|
The nativeCompileOnly, nativeLinkOnly, and nativeRuntimeOnly dependency buckets are available for declaring native dependencies for each step of the native build process.
|
| Head over to the appendix to learn about the difference between the extension and project dependency configuration block. |
Variant view
The variant view aggregates all the variant your host machine could build. Some of those variants can be unbuildable, which would result in a build failure if included in the workload. The plugin creates the variants as required. The view doesn’t provide any APIs to resolve or manipulate the variants eagerly.
Binary view
Each variant contains binaries built as part of the library. The binary view of the extension represents an aggregation of the binaries for all variants. Just like the variant view, the plugin creates the binaries as required. The view doesn’t provide any APIs to resolve or manipulate the binaries eagerly.
JNI library variants
The library variant is the intermediate model for configuring each JNI library to build. The variant represents a single result of the cross-product between all the dimension values, which are the operating system family and the machine architecture. For example, the following build script would produce three variants, one for each operating system family:
library {
    targetMachines = [machines.windows, machines.macOS, machines.linux]
}library {
targetMachines.set(listOf(machines.windows, machines.macOS, machines.linux))
}| Prefer querying tasks, and binaries of the variant through the model as opposed to by name from the various containers. The same goes for file system locations. Read more about the reason in the appendix. |
Each library creates three binaries: a JVM JAR, a JNI JAR and a shared library. Read more about the binaries inside the next section.
Each variant has two important configuration elements: the resource path and a binary view.
Resource path
The resource path configures the location of the shared library inside the JAR. The default resource path is derived from the project group and the ambiguous dimension values (see the appendix for in-dept explanation).
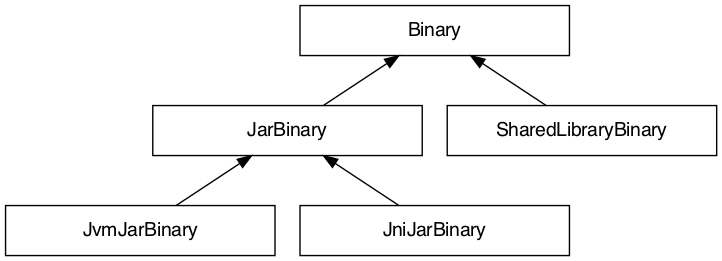
Binary view
The binary view includes all the binaries participating in that particular variant. It includes the JVM JAR, JNI JAR and shared library. We share the JVM JAR across all variants for convenience. It is possible to target each binary by type to narrow the configuration scope. The following shows the class hierarchy of the JNI variant binary types:
Native runtime files
The native runtime file collection contains all the files required for the runtime of a specific variant. The plugin adds the files to the JNI JAR at the resource path location. Typically, it contains the shared library built for the variant and its runtime dependencies. It is possible to add files to the collection. Those files can be any file required at runtime that is ad-hoc runtime binaries or configuration data files.
For more complex use cases, removing the default values disconnects the native compilation from the generation of the JNI JAR file. A particular useful application is the inclusion of pre-built binaries on host system not configured for native compilation.
| The native runtime file collection is task dependency aware. When we add the output of a task to the collection through a provider, Gradle will automatically wire the task producing the output to the task consuming it. The producer would typically be the task generating the JNI JAR. However, any consuming task of the native runtime file collection would benefit from such automatic wiring. |
JNI variant binaries
There are three types of JNI binaries: JVM JAR, JNI JAR and shared library. The JVM JAR contains the compiled JVM code as opposed to the JNI JAR, which includes the linked shared library. The JNI JAR acts only as a wrapper to the shared library for the JVM classpath. The plugins produce only a single JVM JAR while the number of JNI JAR produced depends on the number of variants. In the particular case where we produce a single variant, the plugin will include the shared library inside the JVM JAR, and it will not create any JNI JAR.
Building a JNI application
We don’t provide a mirrored plugin to the JNI library plugin for the application entry point. The recommendation is to split the application into two projects: the application and the JNI library. See this sample for more information on solving this use case.
What’s next?
You should now have a grasp on the concept used by JNI Library Plugin. Head over the JNI samples to see a demonstration of the plugins for common scenarios. Bookmark the relevant plugin chapters for future reference.
Help improve this chapter
Have feedback or a question? Found a typo? Is something unclear? Help is just a GitHub issue away. Please open an issue or create a pull request, and we’ll get back to you.
Appendix
Project dependencies vs JNI extension dependencies
If you are familiar with the dependency configuration block on the project instance (project.dependencies), you may be wondering how does differ from the dependency configuration block on the JNI extension?
The short answer is the extension dependencies delegates to dependency container on the project.
The longer answer is it differ for convenience.
It allows us to provide conveniences methods, similar to gradleApi(), and remove boilerplate code required when depending on macOS system frameworks, for example.
We also want to avoid depending on the names of the configuration.
Always prefer the model
If you already have experience with Gradle, it may be tempting to use the task container or dependency handler to configure the JNI library tasks and dependencies, respectively. You must always prefer the model, that is the extension, the variants and binaries. Each element that you would usually access from the project object is accessible via the model. If it’s not the case, please open an issue.
The plugin configures the JNI library model only when required using all the configuration avoidance provided by Gradle. Some tasks may only get created occasionally. It is, therefore, terrible practice to access them outside the model. It will couple your build logic to the implementation details of the model as well as leave you vulnerable to the configuration ordering problems.
You should also use the model to access important file system locations such as the location of the linked shared binary. It may be tempting to use observation to infer the location of certain generated files. Doing so will lead to fragile build logic and can even lead to flaky builds. Instead, use the model to access those file system location. You will also benefit from implicit task dependencies for each of those file system locations, thanks to the Provider API.
Avoid depending on the named of model elements
Historically, we would configure Gradle by referencing model elements by name. For a single dimension model like the one used for Java compilation, it offers a lot of conveniences. With the multiple dimension required to execute a native build, it quickly becomes a problem. Nokee strives to ensure the complexity grows parallel to the complexity of the project. Simple projects should always stay pure. For this reason, Nokee recommends configuring model elements by their specification instead of by name.
We still need to create unique names for configurations and tasks. To achieve this, we compose names based on the ambiguous dimension values. A dimension value is ambiguous when the dimension has multiple values across all variants. For example, building components for only the Windows (value) operating system family (dimension) doesn’t create ambiguity. We will not include this dimension value in the composed name. On the other hand, building components for the Windows (value) and Linux (another value) operating system families (dimension) creates ambiguity. We now need to differentiate the component targeting Windows and Linux. We will include the dimension values in the composed name. The order in which the dimensions are composed to create the name is an implementation detail.
Even if we would include all dimension values in the composed names, referencing elements by names is hard in a multi-dimension context.
For example, you will often ask yourself, was it windowsX86 or x86Windows?
Both are semantically the same.
A simple static name cannot express the semantic, but the model can.
We saw a lot of confusion from native users over the years.
With the Nokee plugins, we decided to limit user’s exposure to the names as much as possible.